Introduction
Extending the current Internet and providing connection, communication, and inter-networking between devices and physical objects, or “Things,” is a growing trend that is often referred to as the Internet of Things.
“The technologies and solutions that enable integration of real world data and services into the current information networking technologies are often described under the umbrella term of the Internet of Things (IoT)”
What we Learn ?
1. How to program ESP8266?
2. Selecting right IoT wifi module?
3. How to program ESP8266 using Arduino IDE?
4. IoT Software configurations.
5. Which tools to select ?
IOT in simple words connecting sensors, devices to internet (monitoring and control over internet).
for example Home automation, In IOT you can control your electrical appliances from internet and also get file/theft alert on your tweeter, email, etc we will see it in project section how to do that?
Not to take more time on discussing IOT, Lets get started…..
IOT Hardware Requirements to start application development
What do you need to buy for getting started?
1. esp-12 Module or esp-01 Module


2. Which USB to Serial converter is best suitable?

3. A 3.3V power supply
You can make or buy power supply using LM1117-3.3V Regulator. Components required to make 3.3V power supply1. LM1117-3.32. 10uF/16V Capacitor
Circuit Diagram

The ESP8266 runs on anything from 2.8 to 3.5 volts, so a couple of AA batteries will work. Most of us use a 3.3 volt regulated power source. Maximum current draw is 300 mA, so use a supply that can supply 500 mA to be safe. More is better. A weak or poor quality supply will cause the board to reset unexpectedly and make debugging difficult. The NodeMCU Development Board has a USB to 3.3V power supply on the board.
Software Requirements of IOT Programming
Steps for software setup
Step 1: Download latest Arduino Software from www.arduino.cc
Starting with 1.6.4, Arduino allows installation of third-party platform packages using Boards Manager. We have packages available for Windows, Mac OS, and Linux (32 and 64 bit).
Step 2: Download Arduino Core for ESP8266 WiFi Chip from GitHub
Step 3: Installing with Boards Manager
- Install Arduino 1.6.8 from the Arduino website.
- Start Arduino and open Preferences window.

- Enter
http://arduino.esp8266.com/stable/package_esp8266com_index.jsoninto Additional Board Manager URLsfield. You can add multiple URLs, separating them with commas.

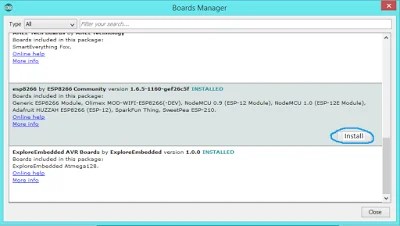
- Open Boards Manager from Tools > Board menu and install esp8266 platform (and don’t forget to select your ESP8266 board from Tools > Board menu after installation).

- Select ESP8266 then press install
Sir, I want to interface two sensors. Which ESP module will be suitable.
You can use ESP8266 with MCP3202 or MCP3204 I2C Based 12-Bit DAC.