Connecting ESP8266 to WiFi is first step when using ESP8266. In all projects of ESP8266 Connecting to WiFi and then accessing other thing is must. ESP8266 can operate in three different modes: Wi-Fi station, Wi-Fi access point, and both at the same time. Let’s Connect ESP8266 NodeMCU to WiFi.
Things you’ll need
- A WiFi router/modem, or You can use your mobile hot spot.
- Your WiFi network name (SSID) and password (WPA). If you need to set up, check or change the WiFi network name or password, you’ll need to check your modem’s setup guide or user manual for instructions on how to do this.
- A computer, laptop or other device with a built-in WiFi adapter or a plugin USB WiFi adapter.

Station Mode (STA)
In Station Mode (STA), the ESP8266 WiFi Module will be connected to a WiFi Network that is already setup by an Access Point, like a WiFi Router.
Soft Access Point (AP)
The second mode of operation is Access Point (AP) Mode. In this mode, the ESP8266 NodeMCU acts as an access point and provide WiFi Network to other stations (like mobile or laptop).
Usually, an access point can provide internet through a wired network to its stations but as there is no wired interface, this Access Point mode is called Soft Access Point.
The ESP Module is first setup as Soft AP mode before configuring it in Station Mode. This is helpful when the username (SSID) and password of the WiFi network is unknown.
Soft AP + Station
In the third mode, the ESP8266 WiFi Module is configured to act in both Station Mode and Soft AP Mode.
NodeMCU ESP8266 Arduino IDE Code Example
The code to connect to a wireless access point is relatively straightforward: enter the SSID and the password of the network you want to connect to, and call the
WiFi.begin(SSID,PASSWORD);
function. Then wait for the connection to complete, your ESP8266 is now connected to your Local Area Network.
To connect to a unsecured WiFi or Open WiFi network remove the password field from
WiFi.begin(SSID); //Enter only SSID
/*
 * https://circuits4you.com
 *
 * Connecting NodeMCU ESP8266 to WiFi Example
 *
 */

#include <ESP8266WiFi.h>        // Include the Wi-Fi library

const char* ssid     = "SSID";         // The SSID (name) of the Wi-Fi network you want to connect to
const char* password = "PASSWORD";     // The password of the Wi-Fi network

void setup() {
  Serial.begin(115200);         // Start the Serial communication to send messages to the computer
  delay(10);
  Serial.println('\n');

  WiFi.begin(ssid, password);             // Connect to the network
  Serial.print("Connecting to ");
  Serial.print(ssid);

  while (WiFi.status() != WL_CONNECTED) { // Wait for the Wi-Fi to connect
    delay(500);
    Serial.print('.');
  }

  Serial.println('\n');
  Serial.println("Connection established!");
  Serial.print("IP address:\t");
  Serial.println(WiFi.localIP());         // Send the IP address of the ESP8266 to the computer
}

void loop() {

}
Results
To check and test the connecting open serial monitor. After opening serial monitor press reset button of NodeMCU to see connection process, Note down the IP.

Open Command prompt by pressing Windows+R key then enter cmd press enter. Enter C:/> ping 192.168.43.225 IP which you got from serial monitor.
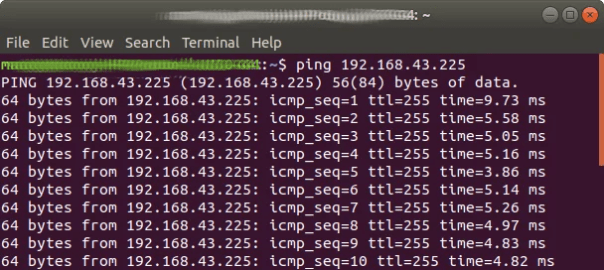
The ping command sends small packets to the IP address of the ESP8266. When the ESP receives such a packet, it sends it back to the sender. Ping is part of the second layer of the TCP/IP stack, the Internet layer. It relies on both the Data Link layer (Wi-Fi) and the Internet Protocol.
You can see that in the example above, we sent packets to the ESP, and we also received response (echo) packets. This tells us that the Data Link, the Wi-Fi connection, and the Internet Protocol are working correctly.
Points to note
- To check ESP8266 connected to wifi use WiFi.status() != WL_CONNECTED
- In loop you don’t need to worry about re-connection in case WiFi Connection lost, ESP8266 WiFi Library Takes care of re-connection to WiFi.
- In loop() do not use any function that takes longer time, anything that takes longer time will reset the ESP with Error: WDT reset
- ESP8266 Connects to only 2.4GHz WiFi.