The GSM modem, phones provides a low cost, long range, wireless communication channel for embedded, microcontroller based applications that need connectivity rather than high data rates. Machinery such as industrial refrigerators, freezers, HVAC, monitoring and vending machines, vehicle service, warning system, security system, remote control etc. could benefit from being connected to a GSM modem.
This tutorial describes how to use an AVR to control a GSM modem using AT commands. The interface between modem and host is a textual protocol called AT-Commands. These commands enable GSM modem setup, dialing, text messaging etc. This particular application connects an AVR ATmega8 and SIM300, SIM900 module using a RS232 connection. Most GSM modems have same AT commands.
Contents
• Types of GSM Modem
• Points to consider while choosing GSM modem
• Interface to GSM modems.
• Implementation of AT-Command set.
• PDU string compression and decompression.
• SMS transmission, how to send and receive.
Types of GSM Modems
There are many GSM modems are available in market Simcom SIM300, SIM900 and Quectel M10. lets review on its features
Points to consider while choosing GSM Modem
There are may GSM modems available in market these are SIM300, SIM900 and SIM900A, Quectel M10 is much reliable and a little bit costly. SIM300 is older modem now it is becoming absolute.
- Power supply requirement
- Available interface UART(TTL) or RS232
- Size
- Price
- Audio interface (MIC/SPK)
Power Supply Requirement
Most GSM modem require 4.2V to operate and they are compatible with 5V and 3.3V some modems are also available in 3.3V. depending on your microcontroller requirement choose correct modem. GSM modem requires more current while sending SMS, making call and during registering on network. Remember always use 2 Amp Power supply. Most new people make mistakes in selecting correct power supply this will cause problem or modem reset while sending SMS.
Available interface UART(TTL) or RS232
As we are using AVR ATmega8 we prefer TTL UART Interface. Most GSM Modem have RS232 and UART (TTL) Interface.
Few GSM Modem comes with USB Interface also, when you are interfacing GSM Modem with PC use USB Interface. It eliminates need of USB to serial converter and few modems are USB powered so no need of external power supply.
Size, Price
Size and price of each modem varies based on its manufacturer use of external components.
Audio Interface (MIC/SPK)
Audio interface is required if you are using GSM Modem to make calls or to interface with DTMF decoder for making IVRS system.
GSM Modem Interfacing
Before we connect out ATmega8 with GSM modem lets have a look at various GSM Modems. These all GSM modem have GPRS capability there is no need of separate GPRS modem.
As you see in this Quectel M10 GSM modem, We don’t have access to TTL (Rx, Tx) connection we need RS232 Level converter constructed using MAX232.

SIM300 is absolute we may not get this in market. It uses LM317 linear regulator to make its power supply, It is better to have DC-DC converter or switching regulator for best results.

We are going to use this GSM modem. It is having TTL Rx,Tx Output . Interfacing of GSM Modem with microcontroller is just connecting these Rx, Tx lines with Microcontrollers UART.

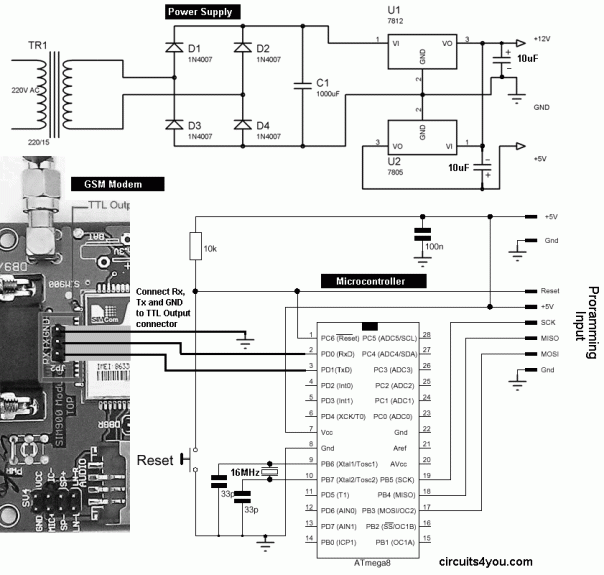
GSM Modem Connections with ATmega8
AT Commands
The protocol used by GSM modems for setup and control is based on the AT Command set. The GSM modem specific commands are adapted to the services offered by a GSM modem such as: text messaging, calling a given Phone number, deleting memory locations etc. Since the main objective for this tutorial is to show how to send and receive text messages, only a subset of the AT-Command set needs to be implemented. The European Telecommunication Standard Institute (ETSI) GSM 07.05 defines the AT-Command interface for GSM compatible modems. In this tutorial some selected commands are chosen, and presented briefly in this section. This command subset will enable the modem to send and receive SMS messages.
The commands can be tried out by connecting a GSM modem to one of the PC’s COM ports. Use hyper terminal or any Serial Terminal Software to give AT commands to GSM Modem.
| Command | Description |
| AT | Check if serial interface and GSM modem is working. |
| ATE0 | Turn echo off, less traffic on serial line. |
| AT+CMTI | Display of new incoming SMS. |
| AT+CPMS | Selection of SMS memory. |
| AT+CMGF | SMS string format, how they are compressed. |
| AT+CMGR | Read new message from a given memory location. |
| AT+CMGS | Send message to a given recipient. |
| AT+CMGD | Delete message. |
Status (AT)
The “AT” command is a status request used for testing if a compatible modem is connected and that the serial interface is working properly.
Command: “AT”
Response: “OK”
Connected and working
Response: “ERROR”
Serial line OK modem error
Echo off (ATE0)
The “ATE0” command is used to config the communication. By default, GSM modems are set to echo any received command back with an acknowledgement.
With echo off, “ATE0”, the modem would have answered “OK” when executing “AT”. The echo off command will reduce traffic on the serial line. The “ATE1” command will enable echo again.
ATE0
Always keep echo off “ATE0” to simplify serial communication with controller.
AT+CMGF Select SMS Message Format
The “AT+CMGF” command is used to set input and output format of SMS messages. Two modes are available:
• PDU mode: reading and sending SMS is done in a special encoded format.
• Text mode: reading and sending SMS is done in plain text.
Always Set it to Text mode for simplicity
AT+CMGF=1
0 is PDU mode, 1 is text mode.
Read Message(AT+CMGR)
The “AT+CMGR” command is used to read a message from a given memory location. Execution of “AT+CMGR” returns a message at [index] from selected memory [M1] .
For example reading from location 1
AT+CMGR=1
Write Message to memory(AT+CMGW)
This command enables the user to send SMS messages.
AT+CMGW=1 //Writes message to location 1
Send SMS Message From Storage (AT+CMSS)
Sends stored sms.
AT+CMSS=1 //Send SMS from location 1
SMS Sending using AVR Microcontroller Code
in your main() subroutine initialize serial and call sendSMS() to send SMS
void sendSMS()
{
     senddata("AT+CMGD=1");
     USART_Transmit(13);
     USART_Transmit(10);
     delay_ms(1000);

     senddata("AT+CMGF=1");
     USART_Transmit(13);
     USART_Transmit(10);
     delay_ms(1000);

     senddata("AT+CMGW=");
     USART_Transmit(34);
     senddata("+919812345678");  //Enter Your Mobile number
     USART_Transmit(34);
     USART_Transmit(13);
     USART_Transmit(10);
     delay_ms(1000);

     senddata("Alert: Fire Detected");
     USART_Transmit(13);
     USART_Transmit(10);
     delay_ms(1000);

     USART_Transmit(26); //Cntrl+Z
     delay_ms(1000);
     delay_ms(1000);

     senddata("AT+CMSS=1");
     USART_Transmit(13);
     USART_Transmit(10);
     delay_ms(1000);
}

void delay_ms(unsigned int de)
{
unsigned int rr,rr1;
   for (rr=0;rr<de;rr++)
   {

  for(rr1=0;rr1<30;rr1++)   //395
  {
   asm("nop");
  }

   }
}


void USART_Transmit(char data )
{
 UDR = data;
 /* Wait for empty transmit buffer */
 while ( !( UCSRA & (1<<UDRE)) )
 ;
 /* Put data into buffer, sends the data */
}

void senddata(char string[16])
{
  int len,count;
  len = strlen(string);

   for (count=0;count<len;count++)
  {
    USART_Transmit(string[count]);
 }
}

void USART_Init()
{
/* Set baud rate */
 UBRRH = 0x00;  //12, 9600 Baud At 1MHz
 UBRRL =12;
//Set double speed enabled
  UCSRA |= (1<<U2X);
/* Enable receiver and transmitter */
 UCSRB = (1<<RXEN)|(1<<TXEN);
/* Set frame format: 8data, 2stop bit */
 UCSRC = (1<<URSEL)|(1<<USBS)|(3<<UCSZ0);
//Set interrupt on RX
//  UCSRB |= (1<<RXCIE);
}
Sending SMS using Arduino
void setup() {
  Serial.begin(9600);
}

void loop() {
      sendSMS(); //Send SMS
      delay(5000); //Wait for few seconds
}

void sendSMS()
{
     Serial.println("AT+CMGD=1");    //Delete privious sent SMS
     delay(1000);

     Serial.println("AT+CMGF=1");   //Set SMS configuration
     delay(1000);

     Serial.print("AT+CMGW=");          //Write New SMS
     Serial.write(34);                  //Double quotes ASCII Code
     Serial.print("+9198--------");         //Enter Your Mobile number
     Serial.write(34);
     Serial.println();                  //Send Crrige return
     delay(1000);

     Serial.println("Your message here"); //SMS Message to be sent
     delay(1000);

     Serial.write(26); //Cntrl+Z character code
     delay(1000);
     delay(1000);

     Serial.println("AT+CMSS=1");      //Send SMS from memory location 1
     delay(4000);
}
Now it is clear that now we can send SMS using Arduino and AVR Microcontroller with simple serial interface with GSM modem.