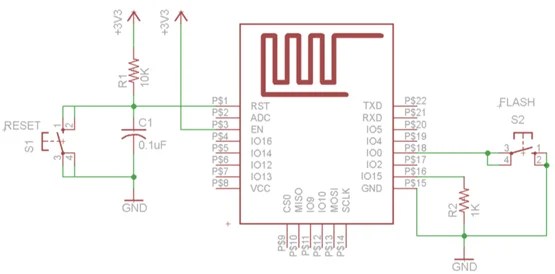
ESP8266 require a sequence of input to enter into programming mode when programming is done using Arduino IDE. With few external components.
Reset Circuit
Reset circuit is required on only ESP12 module. It’s not must but it is better to have it. Putting only 10K resistor as pull-up on reset pin is ok. When RST pin is made low device will reset.
This circuit is similar to the reset circuit of AVR controller. Capacitor (0.1uF) and Resistor (10K).

Chip Enable and Boot selection Circuit
To start the ESP8266 few external components are required for ESP-12 Module as shown in below figure.

GPIO15 (HSPI_CS), Connect this pin to ground through 1KOhm resistor to boot from internal flash. GPIO0 is used to put device in serial programming mode. When GPIO0 is low during power on or reset, this will make device go into serial programming mode.
To put device in serial programming mode
1. Press and hold FLASH (S2) Button.
2. Press and release RESET (S1) button while S2 is in pressed condition.
3. Release FLASH(S2) button after device reset.
4. These steps put ESP8266 in serial programming mode.
Once the device is programmed the internal default flash will be erased, default program can control ESP8266 using AT commands. Once you flash it using above steps you will not able to use AT commands on ESP8266. You have to re-flash with its original AT command boot code to use AT commands again.
In most cases I use direct flashing of ESP8266 this will make design simpler by eliminating need of external controller. Direct programming (flashing) of ESP8266 gives you many advantages over use of AT commands.